An in-depth guide of how to photograph lightning.
This is an updated version of the How To Photograph Lightning article I wrote back in 1998. It was first written long before the latest digital camera’s and photo editing post processing software and equipment. The idea is the still the same but some of the setups on the camera will be a little different with the DSLR.
Fast forward 12 years later as I update my website in January of 2011, I’ve added in some updated info as needed for the digital age and edited for spelling and grammar. When I wrote the first version of this back in 1998, nobody had ever written a how to manual on photographing lightning. Over the years the camera technology has changed but the basic principles of how to photograph lightning have stayed the same.
I must warn you, photographing lightning can KILL you! Several people die each year on golf courses all over the country from lightning strikes.
Tall parking ramps are not much safer to be in over open fields or on top of hills but they do offer you a decent field of view in an urban setting. When photographing lightning you need the perfect spot with the perfect field of view.
This means in a wide-open area where you are normally the highest object. For the beginner a good local parking ramp that is higher than the tree line might be a little safer than standing outside if you stay on the level just below the top level.
You will need accurate mobile weather radar data and several back up location sites to photograph from because the storms do change direction. Having the latest radar data via your smart phone with GPS and the Internet weather data will save you a lot of time and headaches by letting you know where you are and where the storm is.
If your going to do any photography or video and it’s on private property in a parking ramp, it’s a good idea to scout out the location ahead of time and contact the owner to obtain permission to be on their property to do the photography. If you don’t obtain permission you could get kicked out, have your camera gear confiscated and even be arrested for trespassing.
Before I jump into the details about how to photograph lightning, I have to go over a few camera basics because I’m writing this for the basic camera user to try and understand how to photograph lightning.
First, you need to know what an F-Stop is. The F-Stop is also known as the iris of the camera. It controls how much light is let into the camera body to reach the film or digital sensor.
What is emulsion or film speed, also know as ISO in the digital cameras? The emulsion on the film is the key to all film with how sensitive it is to light. Without getting too technical it is what captures the image on the film when you open the shutter on the camera. Emulsion also has to do with the size of the actual pixel or grain of the finished photograph.
To put this into perspective, back in the day (only a decade ago) when we used film to photograph everything, if you were to use a film such as Kodak Royal Gold 25 speed film and then use a Kodak Royal Gold 1000 speed film and have two photographs made that were 11 inches by fourteen inches you could see the difference jump right out at you on the image.
A photograph using the Kodak Royal Gold 25 ISO speed film would look a lot sharper then the 1000 speed film which would look grainy and almost pixilated if it was a digital image. This has to do with the make up of the emulsion on the film that has a lot finer grain. The lower the number rating such as 100 ISO means that you need more light to activate all of the emulsion particles on the film where as a 1000 ISO speed film is ten times more sensitive and works in less light. Example, 200 ISO film needs twice as much light then 400 ISO so just remember that ISO numbers are the direct relationship to the amount of light needed to expose the image. It doesn’t mean the rules are set in stone and can’t be bent or broken.
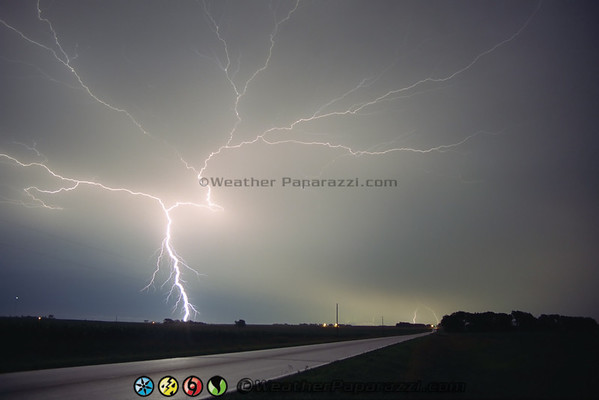
When I worked with film and worked at a photo lab while I was in college, I was able to pull some really cool tricks with lightning photography in the daylight. I took the lightning photograph on the left in August of 1999, just after the Lewiston, MN tornado. It was still daylight out with that perfect back lit sunset as the storm was moving off to the east. The lightning was looking great but it was too light out to do lightning photography.

The trick I used with to obtain this image was that it was still way too bright out to do any kind of timed exposure even with the 25 ISO speed Royal Gold film with a 10 second exposure, so I needed to pull it. What I did was to pull the speed in the camera settings and tell the camera that the film speed was really 6 ISO instead of 25 ISO. By pulling the film back to 6, I effectively was able to let the camera think that the film could withstand a longer exposure of about four times the normal amount of light.
Now the second part of trick has to do with the processing of the image and the processing times. If the film was processed at the normal processing times, the film would have been dramatically over exposed and the images ruined because the amount of light that was exposed was four times the normal exposure for the film. This is where the second part of the pulling trick comes into play by adjusting the amount time the film is left in the developing chemicals.
The normal time for developing color negative or C41 film is to immerse the film into the developing chemical tank for three minutes and thirty seconds. The film is then transferred into the stop bath or bleach tank which stops the developing chemicals processing the image. Since I worked in the photo lab in the processing department, I was able to reset the processing machine for a special development run and “pull” the developing time back to two minutes and forty seconds from the normal three minutes and thirty seconds.
What this did was to under process the film by “pulling” the film out of the developing chemicals before the normal processing time that was required. This effectively cut the processing time that the chemicals used to develop the film by about four stops and compensated for the over exposure of the film. The end result was that I was able to get the two perfect daylight exposure lightning photographs.
So with film, there are different films for different uses and different processing tricks you can use. A simple rule to remember about film is the lower the number the more light you will need to activate the full spectrum of the emulsion.
Sometimes you could be in a very remote area that doesn’t have a lot of natural light and you may need to use a faster or higher speed film such as 400 even 1000 ISO. It all depends on the natural light.
Now with digital cameras, film speed is no longer a factor but the ISO is the key setting on your Digital SLR camera.
I wrote the following statement over 12 years ago and the crazy part is that it is still true today. “What camera you use makes all the difference. Most cameras that you see in the stores such as Target and Walmart are automatic or known as point and shoot cameras. Those cameras don’t give you much control over them except for zooming with a built in telephoto lens to bring you closer to the subject and a flash to use in poor lighting.”
Don’t try to storm chase or photograph lightning with those low budget cameras! It doesn’t matter if they are point and shoot digital or film; they are still disposable cameras for the most part or what I call, “party camera’s” that you can bring to a party to get photos of all of your friends and yourself having fun. There not for use as professional cameras and are a waste of time for storm chasing.
Why a SLR or DSLR? Any camera you use should be able to have multiple lens options for multiple camera situations.
Now there are two versions of the DSLR cameras and the main difference is the sensor size and price. For example, the Canon T2i and Canon 7D have what is known as an APS sized sensor where the Canon 5D has a full sized sensor of 36mm x 24mm digital sensor. 22.3mm x 14.9mm (APS-C size). The sensor on the Nikon DX format cameras is 23.6mm x 15.8mm in total area size. Both sensor sizes will work for you while starting out to learn to photograph lightning but remember you get what you pay for. If you want the best images, you’ll want the best camera, sensors and glass in front of the sensor but it won’t be cheap to get the best gear.
You will want to be able to remove the lens from the camera and put a new one on in a few seconds with using the SLR or DSLR cameras. This way you can swap out a 50mm lens for a 200mm lens to zoom in on a subject or step down to a 28mm lens for a wider field of view or even a fish eye lens that is 15mm. Which lens you use on your camera will depend on the situation and the setting you are trying to photograph.
Photographing Lightning is pretty easy and very difficult at the same time. Every photographer must first do two things before attempting to photograph lightning. The first is to sign your life away. Hey this stuff is very dangerous and can kill you in the blink of an eye. You’ll need to be in the wrong place at the right time to get the perfect photograph of lightning where you could get electrocuted and killed. Lightning is one of the most dangerous parts of severe storms and kills many more people around the world then tornadoes.
The second thing which is easy is to forget everything you ever learned about photography before you started reading this because for most it will defy logic at first.
To photograph lightning, you must first understand what is lightning. Not the technical or meteorological term, but its optical term because Lightning is Light.
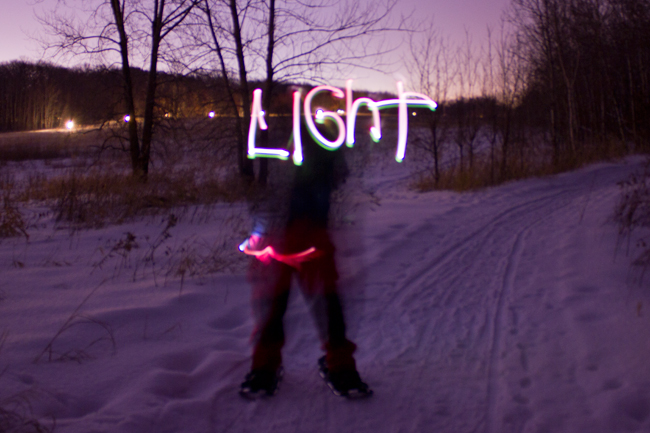
The photograph above shows the word light and was done with a thirty second exposure at F3.5 at 200 ISO to show the natural light settings from the city and the snow covered ground as I wrote the word “Light” with a pocket flash light while the shutter was open. I did this to prove a point that what you really need to photograph lightning is the right balance of the F-Stop to the ISO to the natural light.
This is where a lot of photographers go down the wrong path to try and to photograph lightning with a very fast shutter speed. The logic in that is that lightning is fast so have a very fast shutter or even some kind of trigger system to open the shutter and not over expose the image.
In theory, the fast shutter setup makes sense but in reality it does not work that way most of the time for getting the best photographs of lightning. Notice I said most of the since the Daylight Lightning photography is different then the night lightning photography.
When photographing lightning you don’t want to use a film or ISO speed any faster then 100 and with DSLR cameras, 100 ISO – 400 ISO should be the highest setting on the camera that you use.
When setting up for the storm the biggest mistake a lot of photographers make when they try to photograph lightning for the first time is metering or setting the F-Stop for the lightning. Why meter for one hundred million volts over ten miles long that is hotter than the surface of the sun and only lasts for a fraction of a second? You’re not really trying to photograph the lightning because your trying to photograph the landscape with the natural light and the scenery with the light or lightning being painted across the sky.
This is why I said before that when photographing lightning you do not want to use a film or ISO speed any faster then 100 and with DSLR cameras, 100 ISO – 400 ISO should be the highest setting on the camera that you use.

To the left is one of my more famous images of lightning with the Minnesota State Capital building I took back in August of 1995 during a severe thunderstorm. I shot this image from a parking garage overlooking the capital building using 100 ISO film at F22 for thirty seconds. Notice how the image of the buildings is not over exposed? This is because the image it is balanced for the natural light
The best images come when you meter the f-stop for the available light, not the lightning. This means that if you’re in a city you will want to pick out the brightest source of light and the dimmest source of light then try to get somewhere safe in the middle. The whole trick of photographing lightning is to balance the image for the natural light.
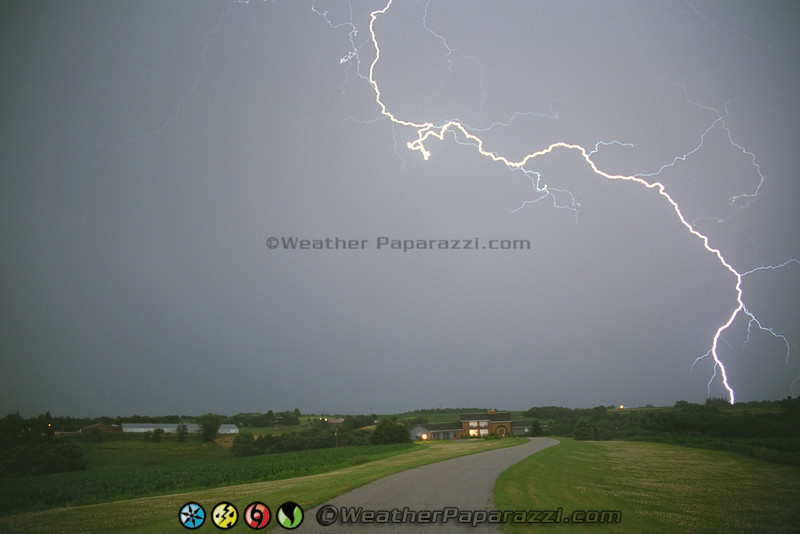
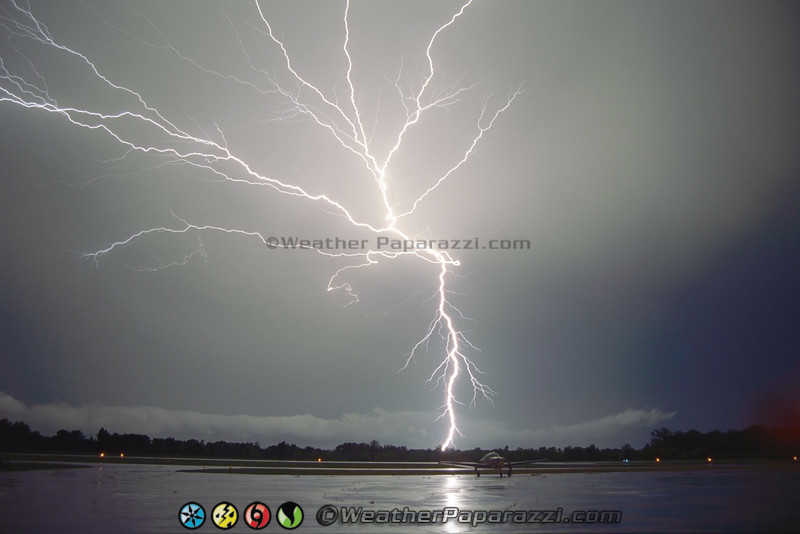
The image on the left shows how to set the scene where the plane is not over or under exposed and the lightning is perfectly exposed to show what the image looked like in that split second of time. This was taken back in July of 2000 with my brother Greg chasing with me at the Princeton, MN Airport.
With a SLR or DSLR like a Nikon or Canon, they have a built in computer system which helps you out with balancing the f-stop out. You need to find the right f-stop for the right setting for the right amount of time.
So forget about the lightning and think, how am I going to get that image of the building or farm field in the distance with only the natural available light?
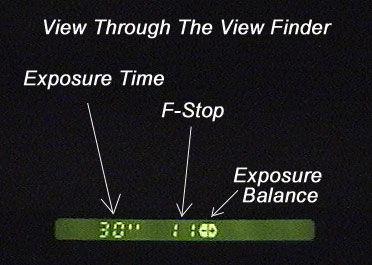
With the older Canon Rebel film camera, here you can see what the inside of the view finder should look like. The exposure time for this shot is setup for 30 seconds. This is with my hand in front of the lens with very little light entering the camera lens. The F-Stop is set to F11 and the <-+> exposure meter shows that the photo is in perfect balance for a 30 second photo at F11 or F-Stop 11.
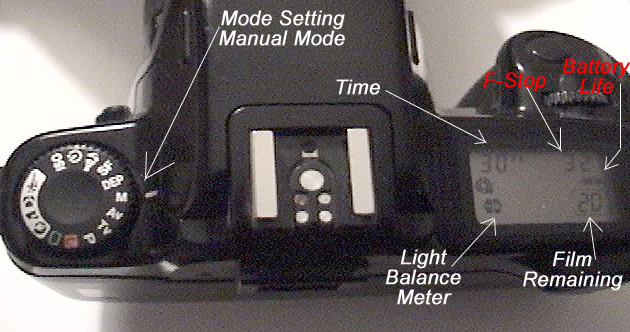
On the left you can see that the camera settings are set to M or Manual Mode. On the right in the LCD Display you can see the settings. The various Canon Cameras have different ways to set this up so you will need to learn your own camera. On the LCD screen you see that the light balance meter is in balance. If it’s not in balance it would have a <- for under exposed or a +> for over exposed image. The F-Stop for this image shows a F32 for a 30 second exposure.
The image on the left is the inside view of the view finder on the Canon T2I DSLR camera where it is similar to the older film cameras but more advanced controls of the image settings.
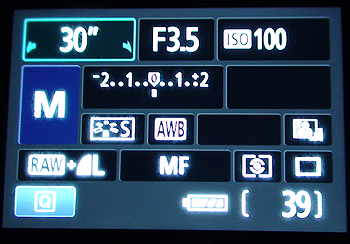
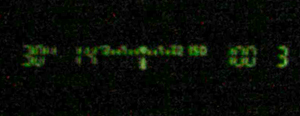
The image on the left is the back screen of the T2I. It shows all of the various different settings for the camera. Here you can see the big M for manual mode and 30” for thirty second shutter at F3.5 and ISO 100. The meter shows it is in balance in the center so it is not over exposed or under exposed. The camera is set to AWB or Auto White Balance and MF or Manual Focus mode and is set to save the images in RAW format.
Once you have found the perfect field of view with a city skyline or landscape with a storm approaching or passing you by, you’ll need to see how long you can open your shutter for. You’ll want to meter the camera shutter for the right length of time and lowest possible f-stop. This is what I call tuning in the image.
First set ISO for the lowest setting such as ISO 100 on the camera. Then you need to set the shutter speed to fifteen seconds to start out. You can go with a longer shutter speed but fifteen is good to start out with to tune in the image.
Next adjust your f-stop so the image at 100 ISO with a fifteen second exposure is balanced out in the light metering setup on your camera like in the images above.
If your already at the lowest possible f-stop such as F3.5 at 100 ISO for fifteen seconds and the image is under exposed or in the negative range in the metering screen, you need to increase the time of the shutter exposure until the meter shows that shutter length is balanced for the f-stop and sensor ISO setting.
If you have increased the shutter speed time to thirty seconds and your still under exposed, this is when you need to raise the camera’s sensor ISO speed setting to 200 on the DSLR. Reset the shutter speed to fifteen seconds and your f-stop back to the lowest setting and adjust the f-stop until the meter shows you’re balanced for the natural light coming into the camera lens.
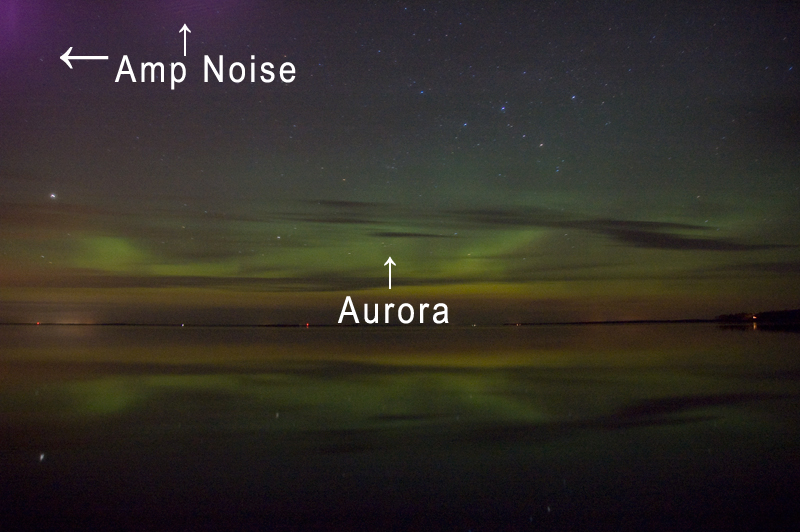
Why do want to keep the time that the shutter is open on a DSLR to fifteen seconds or less? The simple answer is something that is called “Amp Noise”. When the exposures get longer in length to where they are at thirty seconds or longer the camera sensor will start to heat up after a while.
When the sensor heats up, it will create a purplish glow round the edges of the image. It looks like an Aurora Borealis or northern lights in a dark image and in the image below I shot during an aurora event in northern Minnesota with my old Nikon D70s.
Once you have your F-Stop in balance for the natural light, the lightning will take care of the rest provide you are not too close to where the lightning is striking.
You will need to move your camera during the storm. If you are on the side of a storm that is moving west to east and your facing southwest and getting some awesome lightning, remember the storm is moving. You will need to move the camera position on the tripod a little every few images as the storm cell moves. You could end up missing the best lightning photographs because you failed to follow the storm and move the tripod.
If you are photographing lightning out in the open along the side of the road, remember to have a fast escape plan from the rain as well as having a safe place to park. Some of the best images I’ve shot were right before it started pouring rain. Nobody wants to get stuck out in the rain with thousands of dollars worth of equipment.
Last but not least. “LOCATION LOCATION LOCATION.” When ever you’re out cruising around in your car always keep an eye out for different locations you think might be a good location to photograph lightning from. Keep in mind you need permission to photograph from private property.
Just remember to learn as much as you can about the weather so you know what is happening in the sky and you know what it is you’re photographing.
Websites such as http://www.nws.noaa.gov, http://www.rap.ucar.edu/weather http://www.spc.noaa.gov or http://weather.cod.edu will provide you with data of the current and forecast weather so you an idea of what is forecast and where you may want to plan on going chase the storms.
If you have any questions, feel free to contact me via email.